Beginner Guide for Indian Clubs
Without proper movement, there is no strength. Indian clubs favor mobility from the shoulder girdle, solid coordination from every finger, and progressed speeds. Just like the kettlebell swing is the center of the kettlebell universe— the club mills are at the center of the indian club universe. So if club mills look ratchety and not fluid — it will be no surprise your strength will be compromised when moving onto heavier loaded modalities like steel clubs. It is key to find your path FIRST (going slow) with each indian club drill to better groove them in your nervous system. This is why practicing them before every workout will ensure your movement patterns are progressing. Not only that, but they are the perfect tool for warm ups if you have been sitting with slouched shoulders all day or had a tough workout the day before to get loosened up from soreness.
While indian clubs are simple, it’s no surprise when looking them up online you’ll see nothing but a bunch of enthusiasts swinging them all over the place with VERY little control and are more so showing off with zero instruction on how to use them. I don’t care if a fit guy is doing a bunch of cool movements with indian clubs with music playing in the background. The “monkey see, monkey do” way will not work. It’s why when I first discovered them I learned HOW to use them first before I ever coached a student. This is what makes my video tutorials better to give you the right idea about any tool and that’s what were going to focus on in this indian club beginner guide.
Indian Club Weight Recommendations:
Psychical Therapist, Gray Cook, states “these are NOT heavy — they’re fast.” So this means the faster you swing them…the heavier they feel. Indian clubs should be no heavier than 1-2lbs for the warm ups. Indian clubs look just like mini baseball bats and are either made of wood or polyurethane. They should be bought in pairs at the same weight. Personally, I love wooden indian clubs because of their smooth finish — it relaxes the hands to better groove into faster speeds. The only con is, they aren’t cheap. The average cost for a pair of wooden indian clubs will run you $100+. If you’re on a budget, a polyurethane indian club pair with run no higher than $30-50.
Indian Club Mill Drills - Singles & Doubles:
Below are two videos I’ve put together to better educate and coach you on how to utilize indian clubs into your workout routine. The beginner level works with singles and the advanced works with doubles. Beginners should learn indian club mills with a SINGLE indian club first to find out which side of the body compensates most with lack of mobility (which is normal). Having a separated left shoulder in the past, it needed more time and reps than my other shoulder. Working with singles also teaches basic positions like the front rack and side cast for when to relax and tense your grip so the mills flow better. Rushing into double mills will only build your bilateral imbalances even more. So please move on to the advanced level once your beginner skills feel solid. Please remember with any drill…find your path first (going slow) and THEN add speed.
Bonus Indian Club Mobility Drills:
Since a majority of the beginner drills we covered above are more about mobilizing the shoulder girdle I also wanted to show some other favorites that involve using the entire body more with the indian clubs. Here are 3 of the 30 indian club drills I feature in my GADA Club ebook:
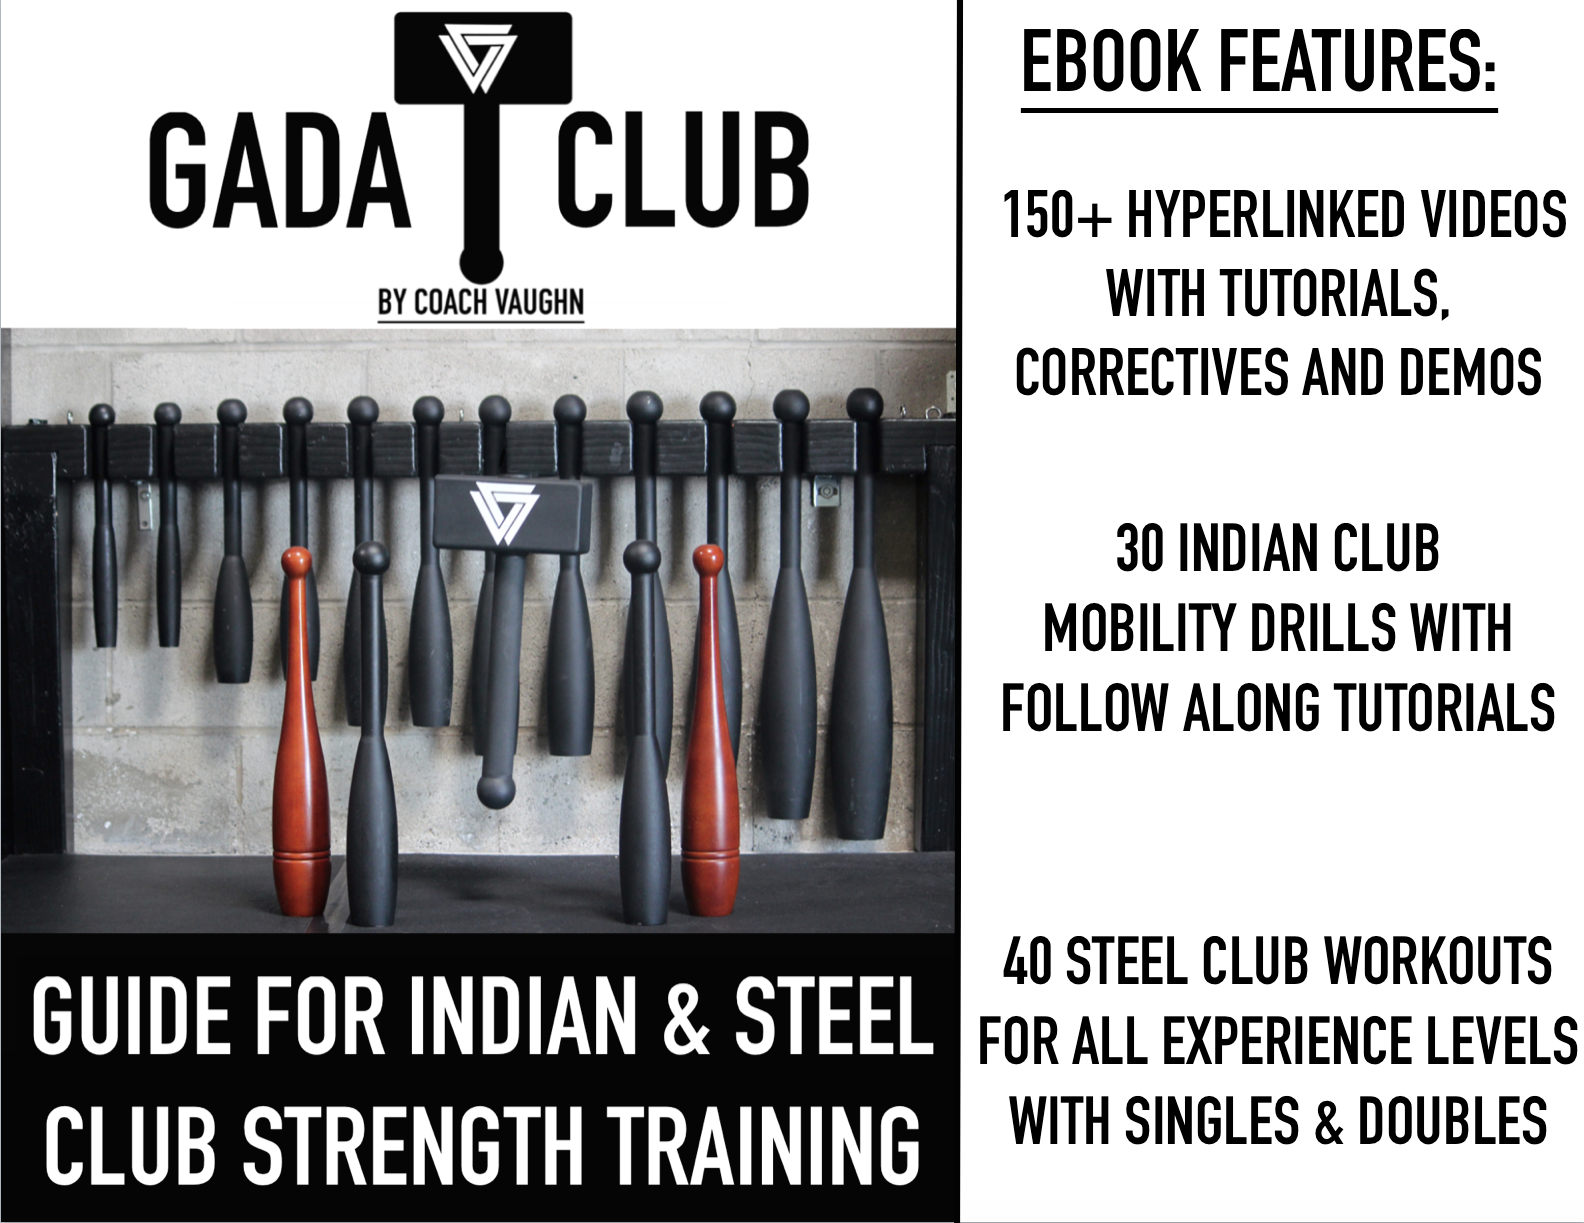
So if you’re a fitness enthusiast that would like to know more indian club drills like these — be sure to check out my ebook GADA Club: Guide for Indian & Steel Club Strength Training. It has educational, private hyperlinked video tutorials with 40 workouts broken down into beginner, intermediate, and advanced levels with over 130+ exercises.
If you’re a fitness professional wanting to integrate clubs more into your coaching business I also have an online course certification partnered with KIPS called Foundations Of Club Training. It’s an entire curriculum I’ve put together for fitness coaches on HOW to coach them for any client with back/shoulder issues, senior fitness, develop workout programs, and in-depth video content to get you indian & steel club certified with accredited CEUs. For more info to sign up — CLICK HERE.
Differences Between Steel Maces & Sledgehammers
“This is so stupid. Just use a sledgehammer.”
This is a common comment I get from uneducated keyboard experts (with no profile pic or video content) on my YouTube Steel Mace workout videos. While I can see why people confuse these two tools as the same thing…they’re NOT. It blows my mind in today’s generation how people will blow over $1,000 on a new updated phone, but if I say a $50-60 steel mace is a great tool to add to your fitness equipment arsenal: ”I can’t spend that much money on that!” However, in the recent years I’ve never seen so much pointless fitness garbage being produced for you to get conned into buying (proclaiming to get you a six pack or to cure pain). A great example are these massage guns running you upwards to $350-600: “Oh my, your pec hurts? Use this overpriced vibrating dildo gun to massage it.”
The steel mace is NOT one of those tools because it be can utilized for many reasons. Having bought a lot of fitness equipment over the last decade I live by the “buy nice, or buy twice” code. Anything made of steel or cast iron has been worth it long term. So I wanted to breakdown why the steel mace is not only a better choice versus a sledgehammer, but educate you on the differences. To be clear, I don’t have a problem with sledgehammers — the issue is it being confused as a replacement for steel mace training.
The Shape:

I wonder which one makes more sense….
Obviously when looking at the two side by side — the head shapes are completely different. However, many think this won’t make a difference using a sledgehammer for mace training. Have you ever noticed the most common fitness tools have a circular shape to them? As you see in the picture above (from left to right): mace, fatbells, kettlebell, dumbbell, barbell bar & plates all have the same circular fashion. This is so these tools can be swung, snatched, cleaned & pressed better with even load across the body. Now imagine if all these tools had a rectangular/square fashion shape to them instead? Your kettlebell cleans would feel horrible, barbell cleans & presses would feel uneven symmetrically, and sledgehammer 360’s would not feel smooth with the hammer head twisting & turning.
The Handle Material:
What most people don’t know about me is I’ve trained in fire academies (fire rescue, wild land, and EMT) in my earlier years. I’ve used many forcible entry tools like sledgehammers in many fire training seminars. The handle needed to be fiber glass so it would resist hot conditions and absorb any ballistic force to not break it in half. The shape of the handle needed to be narrow for any striking, chopping, or jousting action. I’ve seriously gotten rebuttal comments to then buy a wooden handle sledgehammer — which costs the same or even more than a normal 10-15lb weighted beginner steel mace. Sledgehammers are manufactured with fiberglass handles more commonly because it’s cheaper to mold and glue into the head (some go even cheaper and use casted plastic).

The steel mace has the best of both worlds with the asymmetrical load of sledgehammer and knurling like grip of a barbell bar.
What makes steel maces also unique is the flow movements you can put together with squats and lunges. This is done by pushing & pulling the mace from left to right with a dynamic curl. These actions become even smoother with it’s round casted knurling grip — a lot like a barbell bar (picture above). From someone who has used both sledgehammers and steel maces for their INTENDED purpose…the handle material matters. As you continue with mace training you should go up in weight. The typical sledgehammer will go no heavier than 7-15lbs. I’ve built a collection of heavier maces over the years as heavy as 55lbs/25KG to keep my shoulders and grip strength strong (video below). While heavier maces are more expensive — I’d rather pay more to lift real weight to challenge my skills than dilly around with a lightweight sledgehammer and call it a “workout.”
Good luck trying find a 25KG sledgehammer

The Handle Length:
What makes the mace so different than any other tool is it’s asymmetrical load being all in the round head with less than a pound or two in the handle. When performing a 360 or 10 & 2 with a mace you must have what I call in my ebook (GADA Swing): the vertical stack position. So the further my hands are from the mace’s head — the heavier it feels.
The average sledgehammer handle length is much shorter in comparison to longer handled steel maces (so you won’t get the same distal load effect). While shorter handled maces are good for beginners they are pretty much worthless after you’ve perfected your 360 technique. I only recommend shorter maces for fitness coach professionals teaching beginners. If your just a fitness enthusiast looking for just ONE beginner steel mace weight I would go no heavier than 10lbs for women and 15lbs for men. Trust me, the weight may not seem like a lot, but it will be.
Tire Striking is Just Better with the Steel Mace:
I don’t have a problem with sledgehammers when it comes to tire striking. However, the steel mace just flows much better with it’s longer handle and smoother knurling grip. Not only that, I’ve unfortunately seen trainers use sledgehammers and then the head came flying off during a strike and could have seriously hurt someone (if you’re a trainer, this a guaranteed lawsuit). The steel mace is one casted piece — so this eliminates any possible chance of the head flying off. Here are two of my favorite steel mace tire striking variations to show you:
Fitness MacGyver Mindset:
After fitness coaching for a decade and helping many people get out of pain and be stronger I’ve realized there’s still no cure for stupidity. A fitness MacGyver is someone who’d rather:
Glue an old bowling ball to a stick as a mace replacement
Swing a water jug with a rope wrapped around the handle and call it a kettlebell
Use nail hammers as indian clubs (seriously)
Use a cheap sledgehammer with a loose head for mace training
All these pathetic Home Depot actions to save a couple bucks. Listen, I’m very aware maces were made originally in India with a bamboo stick and concrete casted head (known originally as a Gada). BUT! You don’t see people using pay phone stations either anymore with their $1,000 phones now. What I’m getting at is there’s much better options out there to save time and money on. If you have to pay a simple price for quality to insure your safety during a workout…so be it (firefighting also taught me common sense). So even if you still want to disregard this article…at least buy quality sledgehammer. Or be logical, and just buy a damn steel mace if you want to take your training seriously.
Check…and mate, Fitness MacGyver haters.
For those of you who’d like to know more about steel maces, I still have plenty more articles on the website explaining the benefits and best beginner workouts for steel maces. I also have two ebooks out for sale: GADA Swing: Guide for Kettlebell & Steel Mace Strength Training & GADA Club: Guide for Indian & Steel Club Strength Training. You can get both now in this special bundle deal saving 25% off on the price for both (click here).

Steel Mace Beginner Workouts
Just about every year in November, I notice many are ready to spend on Black Friday deals for steel maces. The steel mace is an incredibly simple tool to build grip strength, shoulder resiliency, and can give one hell of a total body workout. The problem is when most get them in the mail finally…they have really no idea what do. Luckily, I‘ve put together a lot of beginner steel mace workout videos over the years to help guide you in the right direction toward moving better and stronger with your mace. My steel mace YouTube videos have reached over 150K views combined and it’s because I’m actually coaching you in detail — not showing off.

My custom Mjölnir Thor Steel Mace
Beginners want one thing - “just tell me how to use the damn thing.” The workouts below are focused on just that showing you how to build strength with simple exercises that work. I DON’T recommend beginners trying to perform 360’s in the first couple weeks. Why? You need to know how to engage the right muscle groups first — mostly the lats. The lats are the big muscle wings of your back and can not only prevent shoulder impingement during exercise, but double your strength output. So if your lats aren't strong and you don’t know how to use them — 360s will only cause possible injury. This isn’t a static dumbbell weight in which you can cheat form (like presses & curls). Since the mace is asymmetrically loaded, it requires your full focus to control it. So keeping your shoulders retracted (or “packed”) into your lats will make your experience much better with the steel mace with the exercises I featured in these workouts:
*SETS & REPS listed after each steel mace video workout*
- Press Outs: 8-10 Reps each side / 3 SETS for each side
- Dynamic Curls: Perform for 45 Sec/ 2-3 SETS
- Side to Side Lunges: Perform for 30-45 Sec / 3 SETS
- Deadlift to Bent Over Row: 6-8 Reps each side / 3 SETS
- Back Step Uppercuts: 6-8 Reps each side / 3 SETS
- Pendulums to Offset Press: 5 Reps each side / 3 SETS
- Squat Pressouts: 5 Reps each side /3 SETS
- Ground & Pound: Perform for 30-45 Sec / 3 SETS
- Walking Lunges: 10yards & back / 3 SETS
- L1: Lap Squat + Side Step Lunges: 10 REPSs / 4 SETS
- L2: Lap Squat + 360 + Side Step Lunge: 10 REPs / 3 SETS Each side
- L1: Front Squat to Back Step Lunge: 10 REPSs / 4 SETS
- L2: Front Squat + 360 + Back Step Lunge: 10 REPs / 3 SETS Each side
So when implement these three steel mace workouts into your routine I would go every other day — 3x a week (Mon/Wed/Fri). If you want to do it 4x a week — simply repeat one of the three. If you’d like more steel mace workouts like these check my ebook GADA Swing: Guide for Kettlebell & Steel Mace Strength Training. It features 40 workouts, and builds into beginner, intermediate, and advanced programs with over 130+ hyperlinked private videos for in-depth tutorials, correctives, and exercise demos for every workout. For more, check out the link HERE. Hope you enjoy the steel mace beginner workouts. You can also bundle it with Volume 2 with heavier mace training saving 25%.
Why Your Kettlebell Snatch Sucks

By Mandy Whitley Photography
Anyone who first sees a kettlebell snatch being performed online — you think “oh it doesn’t look that hard.” Then you attempt it in your next training session out of curiosity. The result, you look like a stripper kipping your hips back & forth and then immediately stop because you realize you’re tearing up your hands from over gripping the kettlebell. Sound familiar? Yeah that was me, and at the time I never thought I was going to get it right (as you can see below). Our biggest mistake as beginners is thinking simple is easy. Simple is what made AC/DC famous because very few could be like them without sounding like a cheap reproduction. Education and practice behind each movement is what makes them more valuable to our training methods. It’s why many don’t understand the prerequisites and critical strength foundations required to perfect this simple exercise.
So after spending years perfecting my kettlebell snatch technique. I want to share some short cuts that will help reduce the time I spent learning it. While it may seem impossible at first, everyone has that moment with a coach “why didn’t someone tell me that ALL along?!” That’s what I’m hoping to give in this article to breakdown what needs the most work to perfect your kettlebell snatch.
The Foundation: One-Arm Swing
Most are very aware of two handed kettlebell swings, but don't know the primary difference with a one-arm kettlebell swing. So what’s the difference? In Pavel’s book, Simple & Sinister, he finds incredible results on how much power and muscle contraction differs between the two and one arm kettlebell swing:

“An asymmetrical load seriously challenges the stabilizers and increases the recruitment of many muscles. When I swung a 32kg kettlebell two-handed in Prof. Stuart McGill’s lab, my glutes fired up to 80% maximal voluntary isometric contraction (MVC). When I did it one handed, the recruitment was up to 100%. And the lat contraction jumped from 100% to 150%! In case you are wondering how it is possible to contract a muscle 150%, the max is isometric. In dynamic contractions higher values are possible - plyometrics are a case in point.” - Simple & Sinister by Pavel (pg.31)
This is what the U.S Army calls “same standards, different conditions”. So if your two arm kettlebell swing is solid, then you have green light to advance to the one arm swing as long as you understand the glutes and lats fire even harder to resist rotation (asymmetrical load) with the one-arm swing. This is a BIG part of the kettlebell snatch because many think you have to rip and pull the kettlebell up overhead with your upper body and twist & turn the body. When really it’s the power from your hips connecting with your glutes and lats that makes the kettlebell float (keeping the shoulders & hips square). So how is this all done? In the video below, I breakdown everything you need to know about it to integrate more into your workouts to start building your foundations for the kettlebell snatch:
The Punch: Front Snatch (aka Touch of Death)
In 2018 I assisted at Mexico’s first StrongFirst Kettlebell certification, and Master SFG Fabio Zonin brought up this great twist on the kettlebell snatch. This a great learning curve for those having trouble constantly tearing up their hands by death gripping the kettlebell as it ascends up overhead. As you see here, we’re doing the EXACT same thing with the one-arm swing. The difference is one the kettlebell is weightless I keep a little flexion in my elbow so I can punch through the handle to flip it over my hand. This is done by relaxing the hand like you’re going to do the “touch of death” on someone really quick. This same action is needed when performing the kettlebell snatch.
Flick of the Wrist (Gooseneck) Technique
This is the smallest and yet biggest game changer to save your grip when performing snatches. As I stated in the intro, many over grip the handle not letting it naturally flip over the wrist (it’ll result in tearing up your hands every time). Watch this quick tutorial to see how to bypass tearing up your grip with the flick of the wrist using the heel of your hand.
Taming the Arc: Low & High Pulls
This is a big understanding in kettlebell training with any swing variation because whether you’re performing a swing, low/high pulls, or snatch — there’s a constant control of the arc.
The white line represents my vertical plank standard (with lats/glutes engaged with core braced) and the red represents my changing condition of taming the arc.
Piecing it Together: Deadstop Snatches
This is a great way to build your kettlebell snatches at a safe speed and builds lat strength to better protect your shoulders in the long run. A major mistake beginners make is going too fast with the snatch, the kettlebell starts controlling them, and then the elbow doesn’t lock at the top. There’s nothing wrong with a simple pause at the top to show you’re controlling the kettlebell snatch with a strong vertical plank. So if you focus on the power of EACH snatch — the better the technique will be. Hardstyle kettlebell training is NOT about quantity, it’s about quality.
Perfecting the Technique: One-Arm Swing Heavy / Snatch Medium
This is why I love heavy kettlebells — they make your medium sized kettlebells feel like paperweights after a set of swings. Remember, the one-arm swing is the foundation and we can still make it even stronger. The best way to do this is to do a one-arm swing one to two sizes bigger than your snatch size weight. So for example, if you’re a man snatching a 24KG — one-arm swing a 32KG. If you’re a woman snatching a 16KG — one-arm swing a 20KG.
The key is to perform no more than 3-5 reps on each side with your heavy one-arm swings. Perform “fast & loose” to relax the body (shake it off / jump around). Keep the exact same hip power and muscle contraction strength when snatching your medium sized kettlebell. The kettlebell should then fly up with ease because you tricked your body into thinking you’re still swinging a heavier kettlebell. It’s a really good quick fix I’ve been using for years on my students.
Conclusion:
So when implementing any of these snatch foundations; be sure to snatch a kettlebell that best suits you. Never try to lift heavy when first learning the essential techniques. In doing so, you’ll be more consistent and get stronger in the process. It also never hurts to have an extra set of experienced eyes (like a certified StrongFirst Kettlebell Instructor) to give feedback on your form and technique.
I’m hoping this article gave you better insight on what details you can work on to perfect your kettlebell snatch technique. I’m currently in the works putting out a GADA Swing: Volume 2 edition in 2019 that will involve more kettlebell doubles and snatches with your steel mace training. You still get my two recent ebooks GADA Swing & Club in this special bundle deal here at this link if you’d like to add more indian clubs, steel maces and clubs into your kettlebell workouts.

Beginner Guide for Steel Clubs
A big thing I’ve noticed amongst fitness enthusiasts/professionals like myself is the pattern of modalities one seeks to the next. A great example is many who are into kettlebells…eventually find steel maces in the process. Then a couple months later with steel mace training — it’ll be no surprise you’ll start noticing steel clubs. Why? Simple answer is we naturally gravitate toward challenging ourselves with different and yet similar tools that are alike with ones were experienced with. So if you’re into bottoms up kettlebell exercises; you’ll find ALOT of the same effects with steel clubs due to the elongated loaded shape being balanced over the wrist. Clubs also share the same characteristics of a steel mace with both being asymmetrically loaded to one side, but with a shorter handle. This in turn challenges your grip strength unlike any other tool.

However, when I got into steel clubs 4 years ago — I was confused on where to start with weights, the best exercises, and the workout programming for it. This is why I wanted to type out this beginner guide for those with a increasing interest for steel clubs and answering these common questions. It’s also why I’ve made detailed educational videos to better explain how steel clubs can better integrated into your strength training — let’s get started.
What are steel clubs and what weights are best?
So when it comes to weight selection, all you need is THREE steel clubs. Having one heavier single steel club for two & one handed variations and two medium sized clubs for double variations is best. The typical steel club weight size should be no heavier than 10-15lbs for beginners. While it may not seem like a lot…do NOT assume it will “feel light.” Remember, all the weight goes up away from the main handle grip. So it will feel heavier than expected. We’re not lifting dumbbells, in which the weight is evenly distributed on both sides. So in the years of coaching many, I’ve gotten a pretty good idea what weight recommendation is best based on your sex, skill level, and weight with this short video below:
What are the best exercises to start out with?
When I first introduce steel clubs to a beginner, my automatic go to exercise are two handed (2H) pullovers to pressouts. The reason being is it’s the best exercise to teach how the steel club’s weight distribution works and teach the safety standard of the side stack position. While steel clubs are lot like maces, we do NOT want to vertically stack the club in the midline of the body like a steel mace. When the club’s short handle stacks in the midline of your body — it’s weighted end is now near your face. So foundational movements like the pullover can turn into a serious bang in the head. So to simply prevent that from happening, we want to SIDE STACK the club to one side and then perform the next (top middle).

When set up in the 2H side stack position, you want think about keeping your body vertically planked and pack the shoulders down & back into the lats. Not many know about the lats, but they are the giant muscle wings of your back and can not only protect your shoulders, but give instant strength (if engaged right). This is extended into the pressout by keeping your elbow pits externally rotated up to keep the lats engaged. If the elbow pits rotate downward (bottom right in picture above), then the traps get more involved and impinge the shoulder girdle and result in poor strength output. So think you want to “break the bar” to emphasize this when the arms are fully locked out. If you have strong glutes, you’ll have a stronger low back — then in relation if the lats are strong…the shoulders are stronger.
So what about the core? This is where the steel club pullover ties this together. Notice in the bottom left in the picture above, this is what we want to avoid in the pullover position. This is called rib flaring, and it’s a major sign that you’d rather use your low back instead of your core. This commonly done with those that press and snatch in overhead loaded position, and overtime can lead to a serious injury if not corrected. With the clubs elongated shape pulled over your back — you still want to keep your lats engaged by keeping the neck long and brace your stomach by “hiding your ribs down.” This cues to resist the rib flare action and to maintain your body’s vertical plank (top left). This abdominal brace action should feel like someone is about to punch you in the stomach. While the Steel Club 2H pullover to pressout is a dominant “upper body” exercise, the core and lower body are still a major part of this. The human body works as ONE kinetic piece, not like Frankenstien. Of course, you can go beyond just the two handed pressout to pullover variation. Watch this Steel Club Education 101 tutorial to see it in action with singles & double variations:
What’s a good beginner workout with the steel club?
Anytime I put together a beginner workout (for any tool), I always think back to how I felt with it when I knew nothing about it and what a experienced fitness coach COULD have shown me. Luckily, you get to learn from my mistakes over the years. First thing I need to clarify is you don't need to do 10-20 different exercises to get a “great workout” in. Since steel clubs test your grip and total body core strength…you only need 3-4 exercises to get the results you want. If you focus on quality, and not quantity with your steel club movements - you’ll be more consistent with your training. Versus the other way, working out with max reps until you injure yourself. It’s why in my ebook GADA Club: Guide for Indian & Steel Club Strength Training, the beginner program focuses only on two & one handed variations with a SINGLE club for 12 workouts. Then once experienced, I integrate double steel club exercises into the intermediate program for 12 workouts as well. Then the advanced workouts are so tough they only feature 2-3 exercises with double clubs complexes for 16 workouts (for a total of 40 workouts). So since building your experience up with the right education is key, checkout this Beginner Steel Club Workout focusing on just that:
So if you liked what you read and want to progress your skills with steel clubs — checkout my brand new ebook program GADA Club: Guide for Indian & Steel Club Strength Training on sale now and can be purchased HERE ( USE CODE: GOINGCLUBBING10 ). It features 30 different indian club warm up drills before you get into the strength training with your 40 steel club workouts. If you’d like to know more about indian clubs, I also wrote another article on them HERE. I hope I gave you a better understanding about steel clubs and what they can offer for your fitness regimen.

Breaking Down GADA Swing
So over the past couple months since the release of GADA Swing: Guide for Kettlebell & Steel Mace Training, I’ve gotten great feedback from many of you all over the world — it’s now sold in 10 different countries. However, I’ve gotten a lot of questions as to WHY steel maces are a perfect one-two punch with kettlebells. I’ve been working with kettlebells for more than a decade (being a certified StrongFirst Kettlebell Instructor) and working with steel maces for over 4 years. So I’m not only going to answer the most common questions, but give you a preview of what my GADA Swing ebook has to offer.
So why these two?
When swinging a kettlebell the hips must be mobile and the shoulders must be stable, packed down by the lats. Then the steel mace 360 flips this, with shoulders now mobile pushing and pulling the mace out and around as the hips remain stable. Both, however, ask the core for a lot of stability, but in different tied fashions. This is what Dr. Mark Cheng (creator of Prehab-Rehab) calls, the “Four Knots:” finding the right amount of stability and mobility in the shoulders and hips. He states, “If your shoelaces are too tight, you can’t move your feet well. If they are too loose, your shoe can come off. The knot must be a balance of strength and mobility.” Watch
What's in GADA Swing exactly?

It’s a PDF file that can be downloaded on your desktop or mobile device. There are over 130+ private hyperlinked Youtube videos to show you the proper form, technique, and details to every movement. Here on your right, is the Table of Contents for GADA Swing. Every chapter subject covered is broken down in detail with readable text, tutorials, and easy coaching correctives for common compensations.

So how does the GADA Swing Programming Work?
The goal of this ebook is for you not only to become stronger, but to be more aware and knowledgeable on how to move better. If you want to be sweaty and sore...go into a sauna and have someone beat you with a stick if that’s your goal. These GADA Swing workouts are designed to challenge you, but not overwork you for your daily life. Realigning your posture, realizing your weaknesses, and working on them is what gets you stronger. While there are many great fitness tools, we need to keep this as simple as possible utilizing ONLY the kettlebell & steel mace. It’s NOT about how much you can do with as many modalities and reps as possible, but rather what you can accomplish with less. There are 12 workouts EACH for beginner, intermediate, and advanced level athletes; with four bonus steel mace tire striking workouts. So you get 40 workouts. That’s three months of training to utilize the kettlebell & steel mace.

“So what makes this different than any other ebook?”
What makes my ebook different than any other is the attention to detail, hyperlinked high quality captioned videos (with different camera angles), and my experience actually training people with these tools. First, many other ebooks ONLY offer a small portion of educational training…with no video content to get the right idea. If a program does offer video content…there’s no workout programming to put it to use. This is why there are two types of video formats in my ebook. The first is the in-depth coaching tutorials and corrective videos like this tutorial with the steel mace 10 & 2:
Then throughout the GADA Swing Program Workouts, 30 to 45 second demo videos with captions, set up positions, and details to remember when performing each movement is in every workout block. The short demo videos also have audio coaching cues if you need more guidance. Here's one of my favorite steel mace flows as an example:
If you’re not familiar with hyperlinks, it means when you click on each exercise name on the PDF file - it will take you to a direct private YouTube video link as pictured below. If you want to perform safely and get stronger...having the right guidance makes a huge difference.
So if you have any other questions about GADA Swing: Guide for Kettlebell & Steel Mace Training you can follow me on Instagram or email me here. You can purchase it HERE at this link. Hoping I gave a better idea of what I can offer both educationally and program wise for kettlebells and steel maces.

Best Indian Club Drills for Shoulder Health

It’s crazy when in our younger years how invincible we think we are to injury, and it’s not until you get a serious injury do you realize you took your body’s resilience for granted. A decade ago, I learned just that playing a pickup tackle football game with friends at a local park…with NO pads. I caught a pass and a player jumped on my left shoulder as I was running and fell with my right shoulder dragging into the ground (with the player’s weight still on top of me). I got up, and could not feel my right arm as I was trying to jog it off. Once realizing something was seriously wrong…immense shoulder pain took over my entire body.
Learning to deal with a separated shoulder was a defining moment in my fitness career because it taught me how the body functions in response to stress and injury. One of the scariest moments of my life (after my shoulder somewhat healed months later) was when I just finished a heavy dumbbell pressing workout and felt as if my entire right side was shutting down. While it wasn’t a stroke, a nerve was getting impinged in my shoulder and causing serious numbness. After that day, I decided not to lift any heavy loads until I had fixed my problem. I refused surgery because I knew too many people who ended up worse after becoming addicted to medication to deal with the constant pain.
So when I found indian clubs to input into my new routine — I got great results being able to press heavy again without any pain or numbness. My body thanked me every time I gave it the real medicine it needed…proper movement. Dr. Perry Nickelston (Stop Chasing Pain) asks: “What do ALL injuries have in common? You don’t move the same after.” So here are five indian club drills that can not only help your shoulders, but your entire body to be more resilient and moving better.
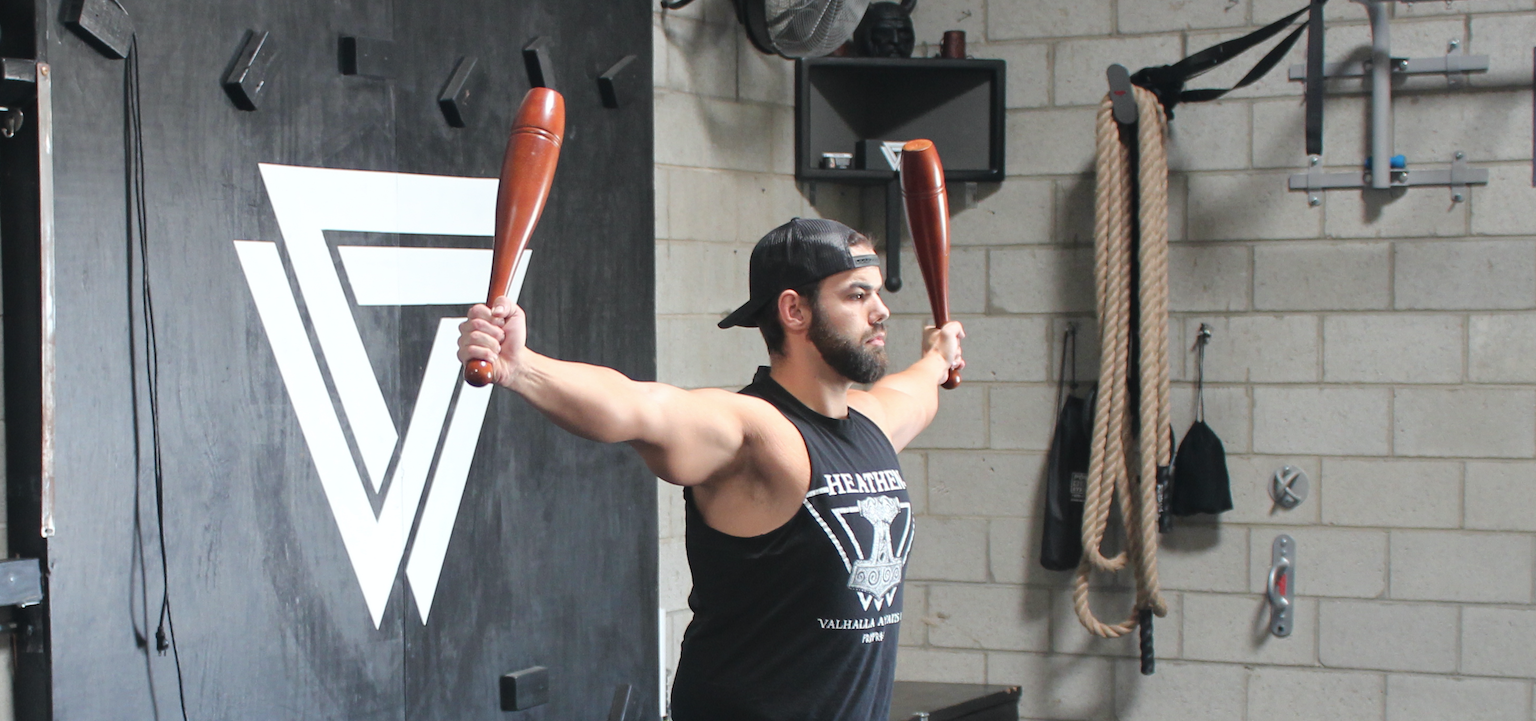
Indian Club Single Mills:
What I love about the indian clubs is that it’s the perfect warm up tool to teach how the lats need to retract back in the shoulders — not using the traps (shrugging). The front rack position is a common setup position with barbells and kettlebell lifting for presses and front squats. Mills are the main move to learn and progress in different speeds. What makes indian clubs unique is only a 1-2lbs pair is needed. The focus should NEVER be on making them heavier, but speeding the indian clubs up through with more acceleration and velocity will equal more mass. So it’s key to go slow first (finding your path) and THEN adding speed once your joints and tendons are ready for it. Performing the mill requires smooth motion from the shoulders and elbow to circle back in & out. These internal/external ranges of motion are something only the indian clubs can do.
Indian Club Double Clock Reaches:
A great drill to open and pry shoulders. Anyone who’s had shoulder issues, knows getting back full overhead arm extension is tough. Clock reaches teach symmetry and even flow for the shoulder girdle. It’s critical to NOT rotate your torso into your low back and make the shoulders do most of the work (not shrugging). Think you want to “connect the lines” first, and add speed to the clock reach.
Indian Club Double X-Pattern Swing:
A great explosive drill to teach the hips to ballistically hinge with a flat back, and teach the arms how to load up for more power. This syncs the body to move as one with the clubs slamming down in and out from a X-pattern setup position. Think a swing is a jump that doesn’t leave the ground and this will create more & more power output for each rep. Be sure to switch your X-pattern position with each rep.
Indian Club Double Half Kneeling T-Spine Crosses:
The average american sits 7-8 hours per day. So poor posture habits with tight hip flexors needs to be corrected. This drill is inspired from Dr. Mark Cheng’s Prehab-Rehab program. It helps realign the shoulder girdle with the spine (t-spine) as one in the half kneeling position. What’s also key about this drill is to create as much spinal rotation as possible without the hips giving stability. You’ll notice your front knee will want to knee valgus out and the rear foot will want to crash in — resist by rooting the feet down to have more stability in the hips.
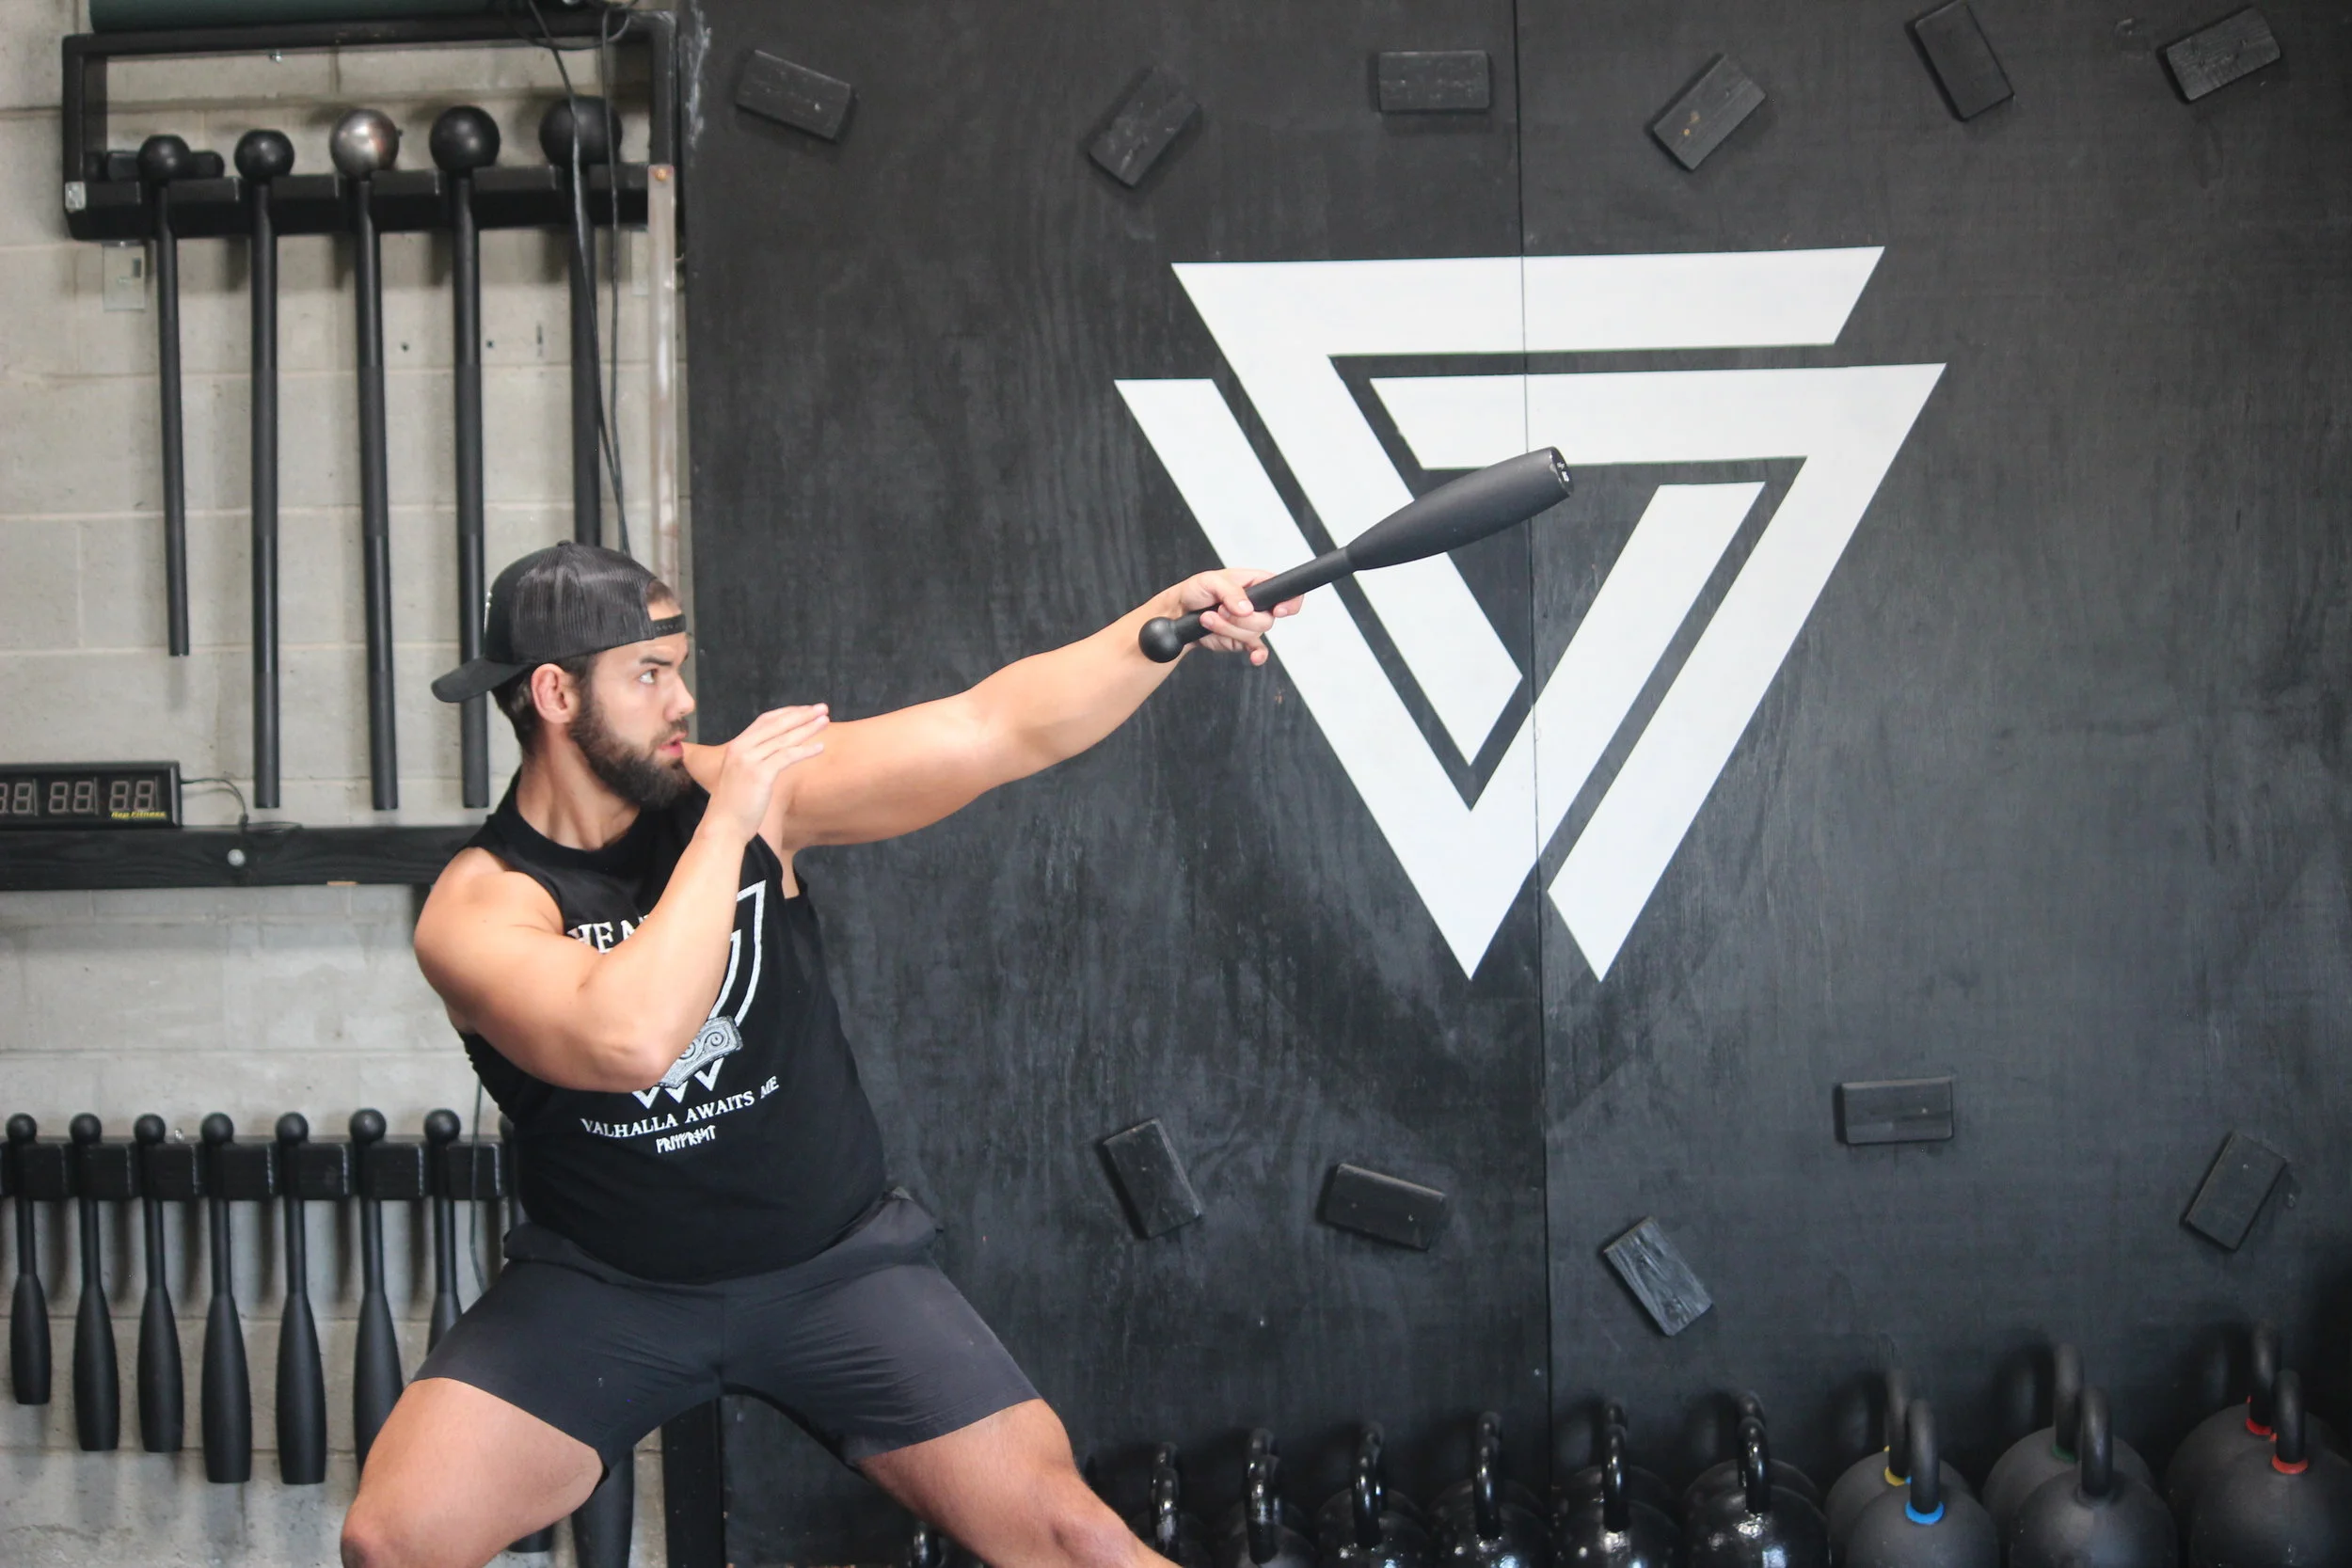
Indian Club Single Striking Mills:
Pivoting the feet is a highly neglected skill to create better striking power. Imagine punching someone, not using your hips or feet…yeah, NO power. Now punch with your feet pivoting in the direction the hips are rotating — much higher power output. However, notice how the indian club makes this more fluid by adding a push/pull effect for the upper body for even more power — having the athletic qualities of a sword strike or football/baseball throw.
These indian club drills have been a part of my warm up routine for years. They can help rid a lot stiffness in the body and shoulder pain from poor posture patterns. As we get older, we must gain new knowledge to combat these tough lessons in life (like when I was a young & dumb playing football with no pads and getting a separated shoulder). While indian clubs are not common, you can purchase a pair made out of wood (like mine in the demos) or polyurethane online.
Be sure to check out my new ebook program, GADA Club Guide for Indian & Steel Club Strength Training. Features over 30 indian club warm up drills and 40 workouts steel club workouts (with 150+ exercises with all private hyperlinked video content). You can get the new program HERE:
Differences Between Steel Maces & Clubs
This has become a very popular question for those with a exciting interest in steel maces & clubs. So as a result, many debate and ask these common questions:
“What are the similarities and differences between the two?”
“Which one is better?”
“Should I buy a steel mace or a pair of steel clubs first…or both?”
“How do I use them and which weight is best for each?”
These are all valid questions to those looking for the right information and to best suit your personal fitness needs. In the last 4-5 years, clubs and maces have gained massive popularity lately being featured more often in social media and popular magazines. However, trends blind instruction and proper education on how to effectively utilize these unconventional tools. It is why they’re uncommon in corporate gyms, and rare to find a fitness instructor with mace/club experience. So I’m going to not only answer these questions, but the give you the right information on HOW to properly workout with these two great strength tools.

So let’s breakdown the two side by side with the various weight sizes they typically are used in. What they both have in common is they’re both asymtrically loaded to one side away from the main handle (unlike conventional tools like dumbbells and barbells being evenly loaded on both sides) and will therefore make them feel heavier than listed when first picking up. Most rookies assume a 15lb mace or club is “too light” when first selecting a weight and then when it comes in the mail — they get an instant dose of reality it actually feels TOO heavy with all the weight distribution away from the handle. This is what makes these two so unique…hundreds of pounds are NOT needed. In fact, you should start no heavier than 10-15lbs when first beginning and no more 40lbs even being experienced with both. Now the obvious difference is the handle length (as seen in the picture). The mace’s weight is all in the mace head — with no less than a pound of weight in the long handle. While also most of the club’s weight is also at the head; it more so elongates it’s weight toward the end of the short handle. It is why if you select a heavier club, the length will be longer (as pictured on the far left). However if you select a heavier mace, the handle length stays the same and only the mace head is larger (far right).
Setting Up Your Grip Between the Two
Next is the grip position, and this is where many get confused with maces and clubs (poor setup leads to poor performance). What both require is a vertical stacked position with the hands gripped under to balance the offset weight. However, the major difference is mace needs to be stacked over the midline (the spine) of your body and clubs should be stacked to side of your body. This is critical for safety standard to understand. Since the club has a shorter handle, it has a greater chance hitting you in the face/head if you perform pullovers or mills from midline of the body. So ALWAYS vertically stack clubs off to your SIDE and packed into the lat with a horizontal forearm with the base hand. The only time clubs should be in the midline is if it’s pressed out or pulled over behind you.
Maces can be stacked in the midline because (once again) all the weight is in the head; so it’s more likely to shift and fall to the side far away as you see in the picture above. Another common question is, “do I switch hands?” Yes for both, always switch your grip to perform both sides by switching your hands (which I constantly state in all my videos with maces & clubs for all exercises).
So which one and what can you do with them?
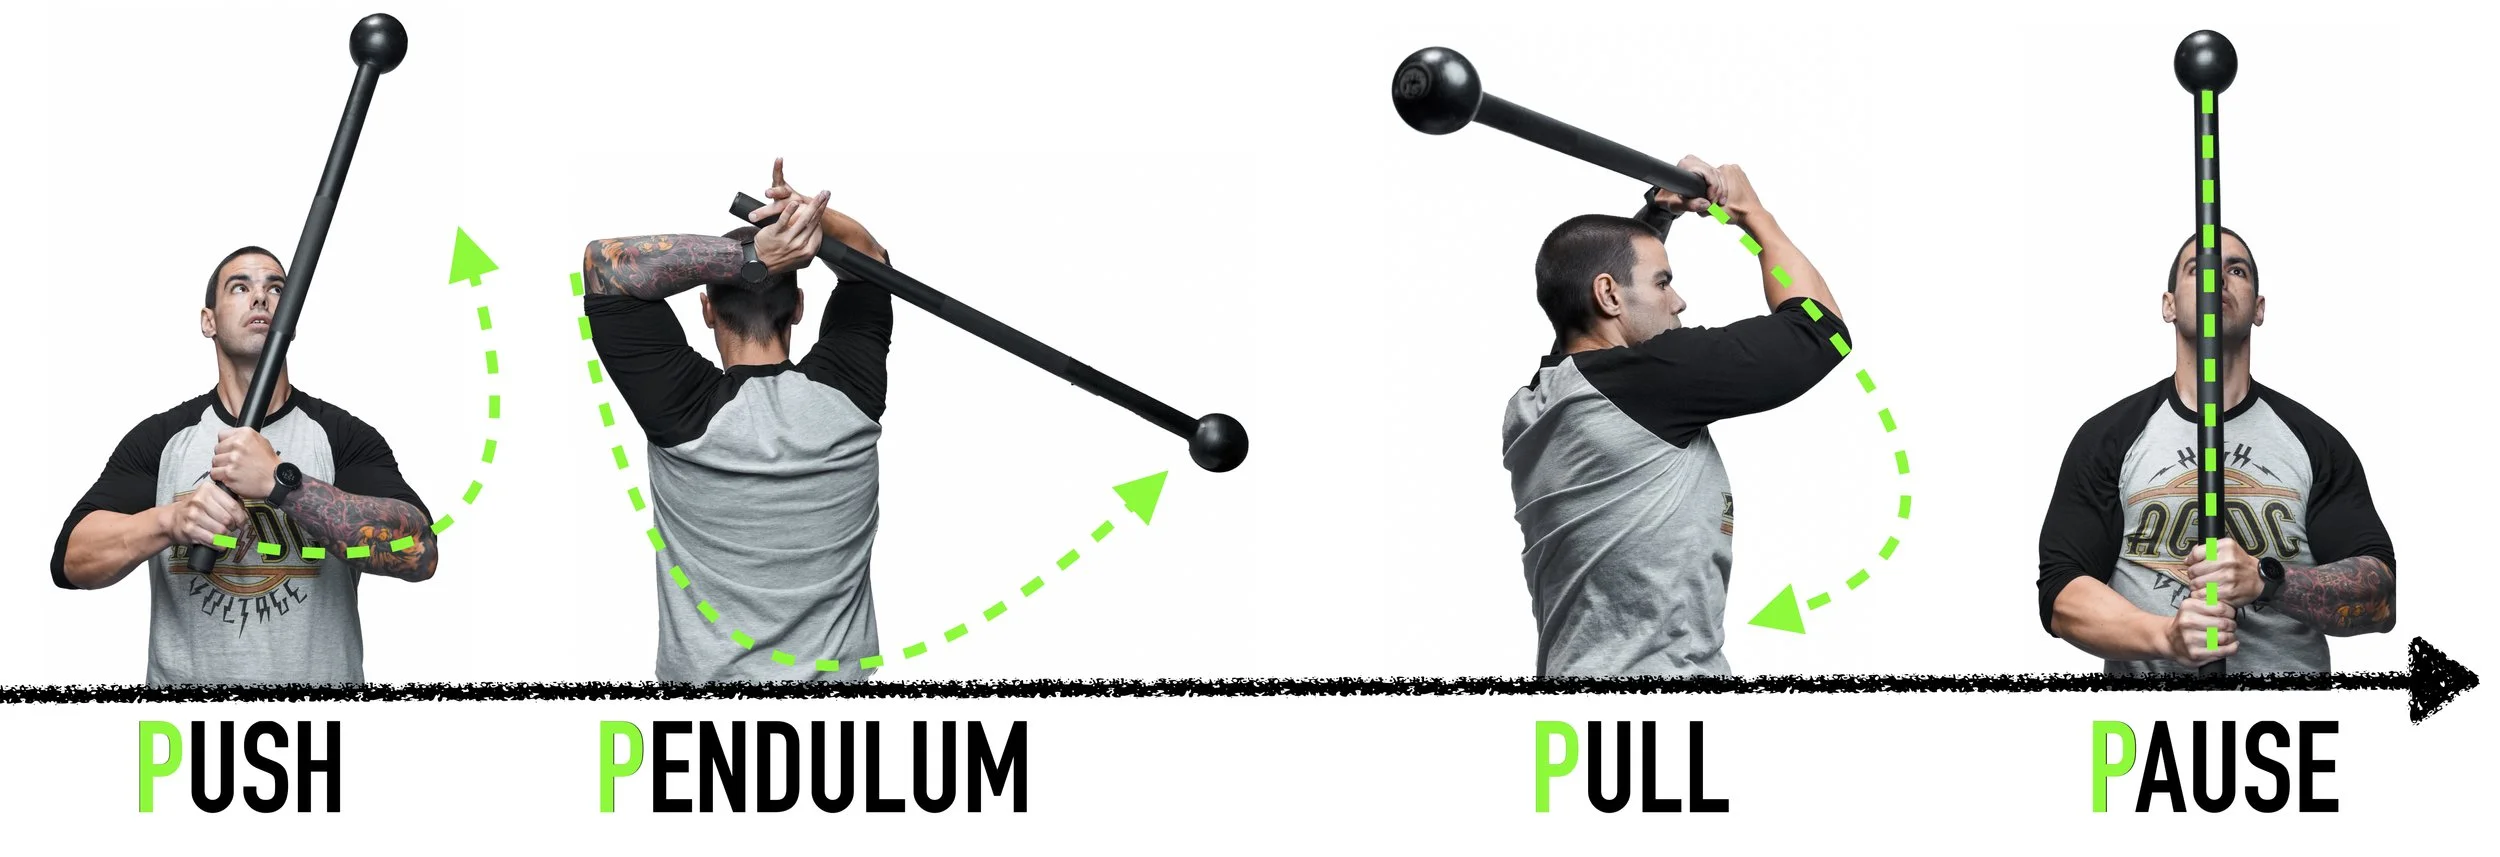
To make this clear, one is not better than the other. It more so depends on YOUR fitness goal and what can best suit your needs. Personally as a example, I started out with the steel mace first and glad I did because I had a separated shoulder injury when playing football years ago. What was interesting about the mace when I first got into them was I could press a 106lb/48KG kettlebell, but could barely perform a 360 with a 10lb/4KG mace at the time. This made me realize I had a huge shoulder imbalance going on. The mace favors fluidity and control all at the same time. This is why I constantly state the 360 is at the center of the steel mace universe (just as the hardstyle swing is at the center of the kettlebell universe). The mace 360 is where you vertically stack the mace by grabbing the base with both hands at a stable 12 o’clock position. Once set, you push the mace around you’re shoulders letting it swing into a pendulum behind you and then pull mace back in toward you’re belly back at the 12 o’clock position. This simple movement grooves the shoulder girdle, strengthens the upper back, and is essence of control. So warming up with 360s made a huge difference in performing kettlebell snatches, pull-ups, and presses with my shoulders feeling less ratchety. So if you feel you're moving more and more like the tin man before your workouts — the mace is the oil to bring smoother movement patterns:
Once your 360 becomes solid, you can start adding more foundational movements like lunges. Demoing is Rebecca, an avid weekend warrior that loves cycling and is a dog agility athlete:
So the club would not have been a great fit for me during that rehab time because it requires more stability and grip strength to maintain the vertically stacked weight above the short handle. So in relation to my rehab needs, the club works perfect for my student, Carlos, who suffered a stroke couple years ago. This unfortunate life changing event resulted in Carlos losing complete control of his right side. Over the years, we have trained consistently to connect new neropathways for his brain to get stability back into his right side. Here, Carlos performs a two handed steel club pressout with a grip glove to secure his right arm to track with his left. The goal of this exercise is to get more elbow external rotation/extension (elbow pit up) to better engage his lat as he pushes and pulls it back into the side stack position with a horizontal forearm:
So the club has a lot of the same effects as kettlebell bottoms up position; but the major difference is the club’s small baseball bat like shape favors (when a kettlebell isn’t dominant in these planes and favors more of a back & forth motion). So the club would ALSO be a great fit for someone like a golfer, baseball player, or even a strongman (just to name a few) looking to increase grip strength as demoed below. Notice how it looks like the same athletic rotational qualities as throwing a ball or striking a blow from pivoting my feet to better gain more power from the ground up. To see this in full effect watch this quick video on side swing variations.
Another one of my favorite strength moves with the clubs is the Double Steel Cross and this also brings up another major difference with maces and clubs. Doubles work incredibly well with clubs, but NOT with maces. So it is recommended to buy a pair of the same weighted steel clubs so you can do more with them down the line. The reason I love this movement is because it flips the script on a common conventional strength exercise like a dumbbell lateral raise. While lateral raises are good, many compensate jerking the hips to get them up to shoulder level. But when you have two clubs stacked vertically in both hands pull them over your shoulders and then extend them out laterally…every muscle in your back gets engaged and truly works your grip strength as well to keep them stacked over your wrists as your arms are fully extended in the cross position.
So as you can see, while both tools can increase performance — it really depends on what is best for your body. While I recommend both of these tools, remember it takes a lot of time and effort to master BOTH. So it is more so recommended picking one and spending 4- 5 times training with it a week to truly get your FULL use of it and then after a couple of months or so…get the next one. If you were a warrior, would you stick with a long sword (mace) or a battle axe (club)? That’s a question only you can answer. What I can answer is the best weight you start out with you decide to get a mace or pair of clubs:
Steel Mace Recommendations:
MEN: Beginner: 15lb - Advanced: 20-25lb
WOMEN: Beginner: 10lb - Advanced: 15-20lb
Steel Club Recommendations:
MEN: Beginner: 10-15lb pair - Advanced: 20lb pair
WOMEN: Beginner: 5-10lb pair - Advanced: 15lb pair
Steel Mace Education 101 YouTube Playlist - HERE
Steel Club Education 101 YouTube Playlist - HERE
I hope I gave some clarity on how these two unconventional tools can be very similar, and yet very different at the same time. If you wish to know more, I have plenty of free workouts featured on my YouTube channel for both the steel mace and steel club. I also have an entire strength ebook program (GADA Swing) with the kettlebell and steel mace training for sale HERE. I've also recently released a new program, GADA Club: Guide for Indian & Steel Club Strength Training as well.
- For special 25% off BOTH programs - GO HERE
Five Steel Mace Squat Variations for Stronger Legs
When many think of squats, utilizing ONLY the lower body seems to come to mind. While this is true that it does work the glutes, quads, and hamstrings to build more muscle in this movement pattern — many forget we’re NOT built like Frankenstien and the body works as one piece. Split routines and machines like leg presses, smith machines, and leg extensions have bastardized what real strength is. Many are surprised to know I’ve personally never used any of those archaic machines to build the muscle I have today. Strength should not include sitting, because the average american already sits on their butt 7-8 hours per day. Why add more sitting in your fitness regimen?
Being mobile and strong is completely attainable. This is why the steel mace can change the way you view “leg day.” Many have accustomed the steel mace a great tool for the upper back, building shoulder resilience with the 360, and grip strength. With all the weight inside the mace head molded to a long handle; it feels twice as heavy than expected. It’s why it’s become one of my favorite tools to not just condition my legs, but my ENTIRE body. So I wanted showcase for you five squat variations you can add with this simple piece of equipment (no gym or bulky machines needed).
Steel Mace Squat Pressouts
This is perfect exercise to demonstrate how the steel mace truly works. This also where I first coach many about the vertical stack position and how to use your lats. The lats are the big muscle wings of your back and what many don’t how use. Pick up the mace and stack both hands at the bottom. Automatically, you’re going to feel the need to shrug into the mace thinking it will make it more stable. It won’t, you need to retract the shoulders down and back with a long neck. Then think you have a $100 bill between your armpit, and if I tried snatching it, you’d be crushing the crap out it with your lats so I wouldn’t take it. Once you have the mace in solid vertical stack position, press it out and squat at the same time. While this sounds simple, never confuse simple with easy. The real challenge is keeping the mace vertical as you perform the squat pressout. You will notice the mace head’s weight will begin to shift and tilt in toward your body. Resist by fully extending the elbows, punching them out, and externally rotating them (showing the elbow pits) at the bottom of the squat. Keep the spine as straight as possible; going no further than knee to hip with the squat depth (there’s no need to go ass to grass). Notice in the demo, I pull the mace back in toward my belly to KEEP my lats engaged and squeeze my glutes with them as I come back up from the squat. Get no more than 6-8 reps with one:
Steel Mace Dynamic Lap Squat
With this squat variation we’re going to be adding more flow and rhythm. Learning and mastering the dynamic curl is of the essence to flowing with the mace. Many compensate with death gripping to the point where they look like a constipated tin man. Notice in the demo below as I perform the the dynamic curl, my hands go into a “prayer position” in the middle; my fingers are completely relaxed and extended as the heel of my palms presses into the handle. Then the hand that goes closest to the mace head (mace hand) will go palm up — as the other hand (base hand) goes palm down. As you squat down, keep the bar near your sternum and engage your lats by “breaking the bar in half.” This will once again, retract the shoulders down and back with a straight spine (just we did with the squat pressout). Do not speed through this movement switching the mace left to right. Think smooth and controlled. As physical therapist Gray Cook states, “speed hides dysfunction.”
Steel Mace Dynamic Front Squat
You’ll notice in this third variation there’s a common theme that all I have to do is switch the mace into a different position to make the squat more challenging (versus just adding on more and more weight to a pathetic sitting machine). The front rack position is a very common position for barbells and kettlebells, but what makes the steel mace unique in this position is it’s offset load trying to pull you out of proper spinal alignment. So to resist, the oblique from the opposite side has to work overtime to contract with all the other core muscles, lats, and glutes. This is a prime example of how the body works as one piece. With the oblique firing now, it’s also very key to keep the forearms vertical with neutral wrists. To engage the lats, think you’re at the top of a pull up bar position and you’re pulling the bar down near the top the chest. Squat down, maintaining the front rack position with the mace head far from your body. Once the hips fully extend back up, bring the mace into a vertical stack position, and gently slide your mace hand down (both palms up) and repeat back into the squat:
Steel Mace Dynamic Goblet Squat
This is where your flow skills with the steel mace will be tested. What I love about this variation is the push and pull effect we’ve been doing with the dynamic curl now gets literally flipped upside down. Set up the mace vertically, but now have one hand on top of the mace head and the other still on the base handle. Once set, reverse the mace head down toward the ground as you squat. At the bottom, pull your base hand in and push your mace hand tossing it into the vertical stack position and repeating on the next side. Notice how the mace is still vertical as the top and bottom position of the squat, but only reversed up and down.
Steel Mace Dynamic Side Lunges:
I hope you enjoyed how steel mace training can add a different dynamic into your regimen. I recommend a 10lb steel mace for women and 15lb steel mace for men with all the variations we just covered. If you’d like more exercises like these, check out my new program GADA Swing: Guide for Kettlebell & Steel Mace Strength Training. For more info about it — CLICK HERE
How to Create Steel Mace Flows
In today’s modern fitness trends, you’ll notice every typical exercise is dominant in ONE plane: deadlifts, squats, bench/military presses. While there’s nothing wrong with these popular strength moves…they only move in a back and forth motion. However, as soon as we’re exposed in athletic environment (not a gym), we shift side to side or rotate the spine (pivoting through the feet) in all planes. This is where steel mace flows are a perfect fit to fill this void in your training program. Why?
What many don’t know is non-contact knee injuries are worse than contact injuries; because if your connective tissues are not used to moving in a certain plane all of a sudden they could tear and never be the same. So more so we need both sides of the coin of strength and mobility to ensure proper movement patterns in any environment. Steel mace flows are about training in 3-D. It is crucial to train joints and ligaments in different planes of movement. Conventional training is VERY linear. Push, pull, squat, and lunge patterns can go far beyond moving just back and forth. We want to move side to side and rotationally as well .
Finding Your Flow:
Here are three steel mace flows testing your skills, body awareness, and control. The steel mace dynamic curl is of the essence to learn first to make these gel as one smooth flow before combining a lunge or squat pattern. The steel mace dynamic side step lunge is perfect beginner exercise to teach how the asymmetrical load of the mace easily flows left to right in a different plane not many are used too. Once mastered, you can now add the 360 by owning the vertical stack position (12 o’clock position) as demoed below:
So for beginners, do flows WITHOUT the 360. When ready, advance by adding the 360 into any flow. Take notice in these next two progressed flows how the same thing applies going from a squat to a 3-D lunge position:
You do not have to limit yourself to just two different movements patterns. The idea with flows is be creative, strong, and controlled in different planes of motion. After training with kettlebells for a decade, and training with maces for the last 4 years - I feel I finally found the missing link. These flows have helped my kettlebell training tremendously making me relax in my breathing patterns, and yet keep my grip stronger than ever. It is why in my new ebook, GADA Swing: Guide for Kettlebell & Steel Mace Strength Training, I combine these two great tools into one solid program for both strength and mobility with 40 programed workouts with over 130+hyperlinked videos - Click HERE to purchase the new ebook like none other

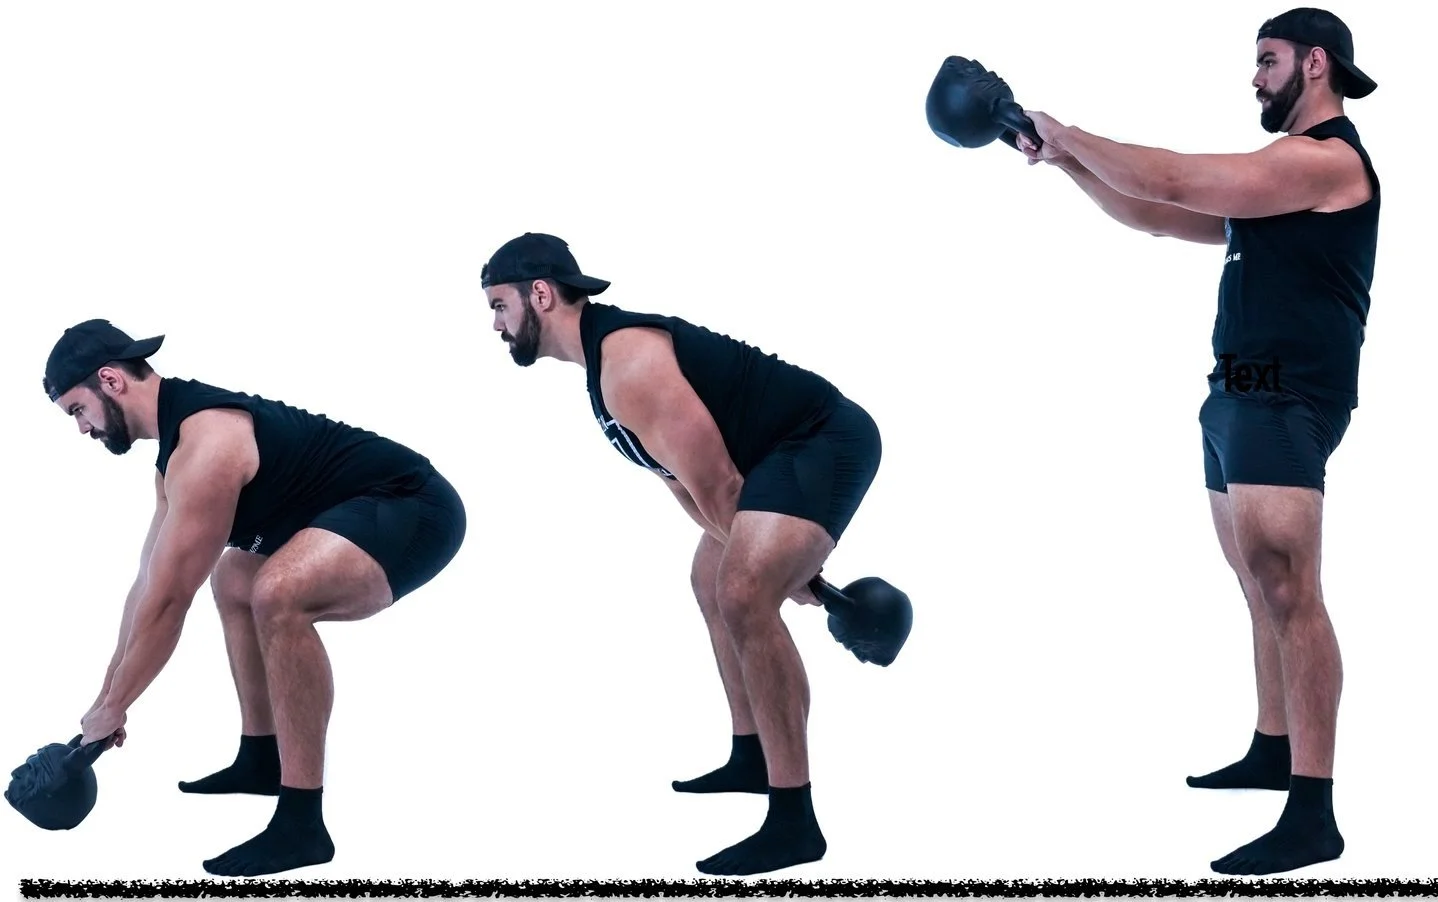
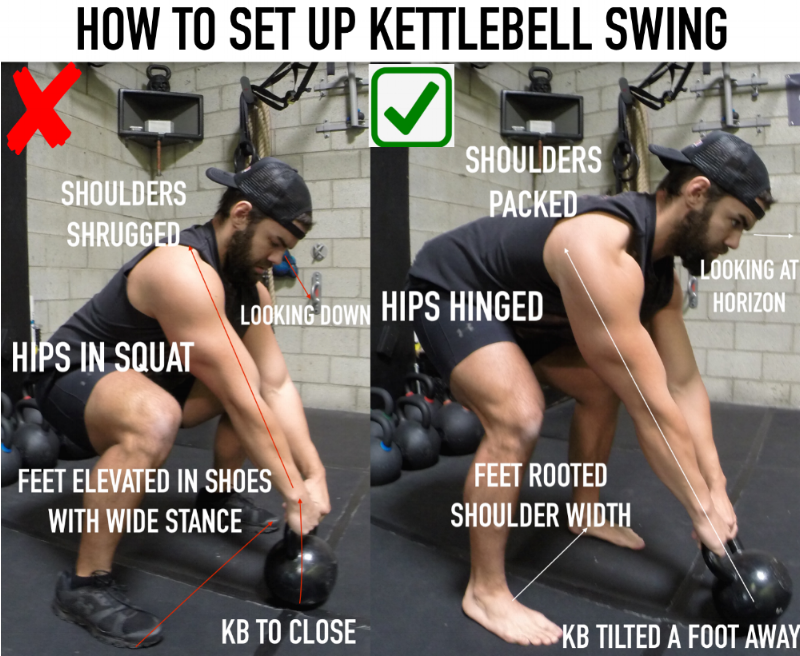
Why Your Mace 360 Sucks
If you read my last article on Why Your Kettlebell Swing Sucks, you realized it’s not so much about the tool and more so HOW the body works when we set up, align, breath, and lift/swing loads using the right muscles at the right time. This is why one of the many reasons swinging exercises are great…you can’t cheat them. However, while the kettlebell optimizes swings - the steel mace flips the script on what’s stable and what’s mobile once it’s swung around the body (360).
The Four Knots
Notice in the comparison video below: when swinging a kettlebell the hips must be mobile (ballistically hip hinging) and the shoulders must be stable packed down by the lats. To the other side, is the steel mace 360. The shoulders are now mobile pushing and pulling the mace out and around as the hips remain stable. Both however, ask the core for a lot of stability, but in different tied fashions. This is what Dr. Mark Cheng (creator of Prehab-Rehab) calls, the Four Knots: finding the right amount of stability and mobility in the shoulders and hips. He states, “If your shoelaces are too tight, you can’t move your feet well. If they are too loose, your shoe can come off. The knot must be a balance of strength and mobility.” The purpose of swings is to control the load as it accelerates and decelerates (or else it controls you). So these four knots are constantly challenged with both the kettlebell swing and steel mace 360. So one is not better than the other, more so both are a perfect 1,2, punch for strength training.
Setting Up the 360: Vertical Stacked Position
Now that we have a solid understanding of the mace 360, we can talk about how to integrate it into your programming and learn how to do it effectively. First, we need to talk about the vertical stacked position to get the proper set up. Now for those who have never worked with maces, you’ll be surprised how heavy a 15lb mace feels. When you stack your hands at the base of the long handle and bring it vertical aligning to your spine; it no longer feels the way you’d expect. It now feels twice as heavy because the weight is all in the mace head (not the handle). So with this, people tend to overcompensate with facial tensing, shrugging, and death gripping the mace. To correct this, RELAX your face, and keep the shoulders down and back into the lats. Then, the real trick is have most of the weight on your index & thumb - which is crucial for the pendulum phase of the 360 (video demoed below).

Steel Mace Pendulums:
Pendulums are a great corrective to prevent death gripping and shoulder shrugging. Pick up the mace, and gently push it over your shoulders, and then let your hands naturally stack at the base of the mace. Keep your feet rooted, and the ribs hidden down bracing the core (if the mace hits your butt - this means you're rib flaring). Start building the pendulum with SLIGHT torso rotation to help maintain the rhythm. The hands should NOT be death gripping at the base (facial tensing is the noticeable sign this is happening). Most of the weight should be on both the index & thumb with the other fingers relaxed, as the spine mobilizes with the shoulders staying tucked into the lats. Perform for no longer than 30-45 seconds:
Putting it All Together: The 360 and 10 & 2’s
Now that the vertical stacked position is in place and there’s an understanding of the pendulum - we can start adding the push/pull mechanics for more fluidity. What I love about the mace 360’s and 10&2’s is getting my mid back mobilized and relaxed; yet still strengthen my grip before a kettlebell workout. Before I got into maces, I remember before each set of heavy kettlebell swings, I would do kettlebell halos during my rest period to keep my T-spine mobile, and not to get TOO tense. Now with the mace 360, I not only get the mobility, but the insane grip strength as well to complement my kettlebell lifting techniques. So here’s a full tutorial breakdown of the differences between 360’s and 10 & 2’s and how to do them effectively: